Those bedrooms though...
Spring was turning into summer and the most telling sign was the temperatures creeping up into the 90s. I was fortunate going into the project (since it was in the fall) that when I had the power turned back on, the furnace and the blower still worked. Actually the furnace and the blower weren't that old. Neither was the AC unit, which was miraculously still outside (this is amazing considering how long the house was obviously vacant and abandoned).
Maybe the crooks in Memphis knew something I didn't. Because when it started getting unpleasantly warm outside, it was also unpleasantly warm inside Marguerite's house. An inspection from Billingsley Heating & Air gave me the news I was kind of dreading. There was a hole in the coil and it wouldn't hold freon. Translation: new unit. This was the first MAJOR expense that was unexpected. So I guess I was doing good since we were already around 8 months in. (Side note: seriously if you have any HVAC needs in the greater Memphis area... I will shamelessly plug Billingsley... he is reasonable and honest... and he SHOWS UP when scheduled).
Marguerite's house was also getting a new roof to match the new roof on the garage (this was an expected cost). There were four (!) existing layers of roof on the house. You can usually add a new roof on top of an old one, but the maximum number of layers is three (so the roof doesn't cave in from the weight). So this entailed a tear off and new roof install. I used Bullseye Home Services for this... and they did an excellent job. I couldn't even tell they had been there (no trash in the yard or debris from the tear off) and they did everything while I was on vacation with dad's family in Florida.
Marguerite's house was also getting a new roof to match the new roof on the garage (this was an expected cost). There were four (!) existing layers of roof on the house. You can usually add a new roof on top of an old one, but the maximum number of layers is three (so the roof doesn't cave in from the weight). So this entailed a tear off and new roof install. I used Bullseye Home Services for this... and they did an excellent job. I couldn't even tell they had been there (no trash in the yard or debris from the tear off) and they did everything while I was on vacation with dad's family in Florida.
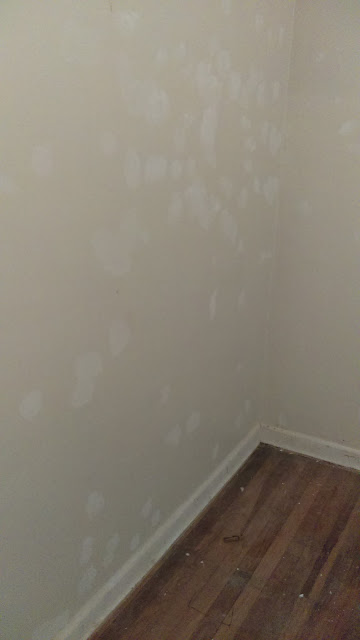
Upon returning from a small reprieve, this was the point in the project that I decided I was going to try to finish the rest of the back of the house... three bedrooms and the main hall. The master bedroom was mostly just dirty. Don't get me wrong, there were a lot of nail holes and minor cracks in the plaster, but it was cosmetic. The front bedroom was similar, with the exception of a couple of more significant cracks in the ceiling. So there were a lot of spots that looked like this while mudding...
But the second bedroom by far needed the most work. There was a metal return vent in the closet (that wasn't enclosed). I opted to glue a thin sheet of luan plywood to the metal backing on the return and add trim, just to close it up and make it paintable. There were also some pretty big cracks in the walls. But the ceiling was the worst... the photo below sort of shows that the paint was peeling over the entire surface of the room. But that doesn't really do it justice.

A section of the drywall/plaster combo that was in this house had become detached from the ceiling joists, but didn't fall (hence the huge cracks). My step-dad assisted with adding some pretty significant screws to pull it back up to the joists. Which led to what can only be described as the groundhog day portion of this project. I tried to hire out this job because I knew it wasn't going to be pleasant. But after trying a few avenues, I just started doing it myself. I honestly don't know how many giant tubs of the product below I actually bought.

Or how many days I spent working on this. The process was mud, sand, scrape, repeat. Because for some reason, the dampness of the mud would activate more paint to peel. So I would come back expecting to sand and be done and there would be new cracks. So I would have to scrape again, mud again, and sand again... only to find MORE CRACKS. I would also like to add that mudding and sanding while holding your arms over your head is not a piece of cake... which is why I used the smallest little bitch of a sander. It is lightweight and easy to hold and it gets shit done.

In the meantime, while I was in the mud/sand circle of life, I had also removed (and labeled - that is important!) all of the doors to these rooms (with help from my mom and step-dad). We attached 2x4s to the bottoms of the doors (as feet) so they would stand up on their own for priming and painting. This makes it much easier to work on them. As an aside, if anyone ever tells you that you can simply take down old doors, sand and paint them, and put them back up with no issues, they are either delusional or they have never done it. I can't say that the doors closed correctly before we took them down (because I never checked). But there was a lot of jimmying and sanding and touch up going on when they were returned to their former locations. In fact, there are still a few doors that need some work.
In the background of the weeks of work on these rooms, there was an ongoing discussion about paint. I had purchased (at various points) a variety of gray and beige colors from the "mis-tint" rack at Lowe's/Home Depot over the prior year or so in anticipation of needing a neutral color for the house. At some point, I decided, hey... I can just mix these neutral paints together and get about 5 gallons of paint to use for everything... all one color. This, of course, did not work... much to my dismay. I mixed the paint together, but it was waaaaayyyy too dark for the size of the rooms of this house and the finish was somewhere between satin and semi-gloss. On a house with sheetrock walls, I would go for it. For a house with plaster walls, a flat finish paint is the best option to show fewer imperfections.
So I trekked over to Home Depot to get some gray paint chips. There are a lot of different grays, y'all. Some have blue hued undertones, some green, some yellow, some brown, some purple! I got about 150 paint chips of different grays and took them room to room with the lights on and off (for natural vs incandescent lighting) and there was only ONE gray that looked like actual gray in all of the rooms in all of the lighting. Behr Eon Gray.

I am not a fan of gray. I just want to put that out there. If this house were going to be my permanent house, there would probably be zero gray. But it is a color that is on trend and a lovely neutral palette to work with... if neutral is your thing. And I knew it would work really well with the white trim and some dark stained hardwood floors. My thing is more rainbow than gray... but I digress.
I want to add one comment about the paint. I have used a huge variety of paint in the projects I have worked on in the past. I spent a while buying different finishes, brands, and quality vs. value paints while I was working on some stuff for an art festival I did in 2015. I will only use Behr paint for rolling/brushing on textured or smooth surfaces. I don't know how well it does in a paint sprayer (not a fan of those), but I can tell you that it is gold for the old fashioned rolling that I always do. It is thicker/not runny and stays on the brush/roller without a lot of dripping and it isn't stinky. Because it is thicker, there aren't as many runs/drips down the wall or paint splatters that come off the roller in tiny dots (all over you and everything else). And you don't feel like you are fumigating yourself since it is no VOC and generally doesn't have a strong odor like some others I have used. I typically pick satin finish for my house, but flat works best for imperfect walls. It has been washable and durable (several mishaps resulted in magic eraser already).

Pro tip: I used plastic drop cloths cut to fit the room exactly and taped down at the edge of the trim with painter's tape. This provides an edge by the floor so you don't have to cut it in carefully and it protects the rest of the floor while you're painting. My mom and step-dad suggested this and implemented it in a couple of rooms. It saved my life the day I moved the paint ladder too close to the wall and didn't notice that it dislodged the paint tray from the ladder. When I moved the ladder back out, the whole tray fell on the floor and went everywhere. All over the DROP CLOTH thank goodness.
Pro tip 2: if you decide to do this, make sure you run a box cutter across where the edge of the tape meets the edge of the trim when you are ready to remove the tape. The paint will pull off the trim if you don't separate it from the tape first. This is also true if you use painter's tape to cut in walls and trim. I cut in with a steady hand and Purdy 2.5 inch angle brush, but not everyone is a painting expert. lol

Pro tip 3: always start with the ceiling. It will splatter on the walls when you roll because ceiling paint is generally pretty thin (also an additional valid argument for the dropcloth). Better to paint the ceiling first than paint the walls twice. Paint the trim second. You usually want to pick a higher gloss paint for trim (I used semi-gloss, but some use high gloss). Higher gloss paint is typically easier to clean and works well for trim or doors that will constantly get dirty from your hands. Wall color goes on last. It's easier to touch up trim than walls especially if you are using a higher gloss paint on the trim. If you have time to let the paint on the trim cure before painting the walls, even better. Painter's tape is actually not super friendly when you apply it to uncured paint. Also, don't leave it on there for too long after the paint is dry. It will get stuck and not come off without removing the paint underneath it/or leave a sticky residue (hence why I usually avoid it).
Pro tip 4: make sure you mix up your paint. Shake the can before you open it, use the paint stick stirrers they give you, and if you bought 5 gallon buckets, invest in a mixing paddle for your drill. If the paint isn't evenly mixed up, it will not be a consistent color or thickness when you use it. Also, if you buy more than one gallon of paint, buy a big bucket and mix the two gallons together. Shades can vary slightly if they don't mix them exactly right at the store. Unless of course you're looking for a two-tone room. lol

Back to our regularly scheduled programming... in addition to the freshly smooth ceilings and walls, and new ceiling, wall and trim paint, these rooms also got: new switches and receptacles (thanks to dad for installing), new faux wood 2 inch blinds (thanks to mom and step-dad for installing), new doorknobs (satin chrome), and new black satin finish ceiling fans with clear shades. These fans are pretty cheap ($80) Hunter fans from Lowe's. I installed them in our current house about 6 years ago and they have pretty much been on for that entire time (and are still going strong with no wobbles or weird noises). They aren't too big for a smaller room, but they are powerful enough for a larger room. And did I mention cheap?

Look at how that wretched ceiling turned out...

Pretty amazing right? I didn't take a lot of after pictures of the bedrooms before my sister moved into the house. But I am such an expert mudder/sander/painter that they all look uniform anyhow. lol This is how the master bedroom looks with the gray walls and white trim...

Pretty fantastic, since we started with this...

It's kind of amazing what a little paint will do. And HOURS AND HOURS of mudding and sanding, ad nauseam.
Side note: Marguerite's favorite color was clearly green. The carpet was green. The kitchen was green. The furniture was green. I fought with myself a lot over painting everything gray. She wouldn't like it. I started to paint one of the closets green for the hell of it. I may still do that. But despite all of that... I think she would still be proud of the progress that I have made and how cute my sister is making things now...


But the second bedroom by far needed the most work. There was a metal return vent in the closet (that wasn't enclosed). I opted to glue a thin sheet of luan plywood to the metal backing on the return and add trim, just to close it up and make it paintable. There were also some pretty big cracks in the walls. But the ceiling was the worst... the photo below sort of shows that the paint was peeling over the entire surface of the room. But that doesn't really do it justice.
A section of the drywall/plaster combo that was in this house had become detached from the ceiling joists, but didn't fall (hence the huge cracks). My step-dad assisted with adding some pretty significant screws to pull it back up to the joists. Which led to what can only be described as the groundhog day portion of this project. I tried to hire out this job because I knew it wasn't going to be pleasant. But after trying a few avenues, I just started doing it myself. I honestly don't know how many giant tubs of the product below I actually bought.

Or how many days I spent working on this. The process was mud, sand, scrape, repeat. Because for some reason, the dampness of the mud would activate more paint to peel. So I would come back expecting to sand and be done and there would be new cracks. So I would have to scrape again, mud again, and sand again... only to find MORE CRACKS. I would also like to add that mudding and sanding while holding your arms over your head is not a piece of cake... which is why I used the smallest little bitch of a sander. It is lightweight and easy to hold and it gets shit done.

 |
| *masks are important for sanding* |
 |
| sanding dust level: ridiculous |
In the meantime, while I was in the mud/sand circle of life, I had also removed (and labeled - that is important!) all of the doors to these rooms (with help from my mom and step-dad). We attached 2x4s to the bottoms of the doors (as feet) so they would stand up on their own for priming and painting. This makes it much easier to work on them. As an aside, if anyone ever tells you that you can simply take down old doors, sand and paint them, and put them back up with no issues, they are either delusional or they have never done it. I can't say that the doors closed correctly before we took them down (because I never checked). But there was a lot of jimmying and sanding and touch up going on when they were returned to their former locations. In fact, there are still a few doors that need some work.
In the background of the weeks of work on these rooms, there was an ongoing discussion about paint. I had purchased (at various points) a variety of gray and beige colors from the "mis-tint" rack at Lowe's/Home Depot over the prior year or so in anticipation of needing a neutral color for the house. At some point, I decided, hey... I can just mix these neutral paints together and get about 5 gallons of paint to use for everything... all one color. This, of course, did not work... much to my dismay. I mixed the paint together, but it was waaaaayyyy too dark for the size of the rooms of this house and the finish was somewhere between satin and semi-gloss. On a house with sheetrock walls, I would go for it. For a house with plaster walls, a flat finish paint is the best option to show fewer imperfections.
So I trekked over to Home Depot to get some gray paint chips. There are a lot of different grays, y'all. Some have blue hued undertones, some green, some yellow, some brown, some purple! I got about 150 paint chips of different grays and took them room to room with the lights on and off (for natural vs incandescent lighting) and there was only ONE gray that looked like actual gray in all of the rooms in all of the lighting. Behr Eon Gray.

I am not a fan of gray. I just want to put that out there. If this house were going to be my permanent house, there would probably be zero gray. But it is a color that is on trend and a lovely neutral palette to work with... if neutral is your thing. And I knew it would work really well with the white trim and some dark stained hardwood floors. My thing is more rainbow than gray... but I digress.
I want to add one comment about the paint. I have used a huge variety of paint in the projects I have worked on in the past. I spent a while buying different finishes, brands, and quality vs. value paints while I was working on some stuff for an art festival I did in 2015. I will only use Behr paint for rolling/brushing on textured or smooth surfaces. I don't know how well it does in a paint sprayer (not a fan of those), but I can tell you that it is gold for the old fashioned rolling that I always do. It is thicker/not runny and stays on the brush/roller without a lot of dripping and it isn't stinky. Because it is thicker, there aren't as many runs/drips down the wall or paint splatters that come off the roller in tiny dots (all over you and everything else). And you don't feel like you are fumigating yourself since it is no VOC and generally doesn't have a strong odor like some others I have used. I typically pick satin finish for my house, but flat works best for imperfect walls. It has been washable and durable (several mishaps resulted in magic eraser already).

Pro tip: I used plastic drop cloths cut to fit the room exactly and taped down at the edge of the trim with painter's tape. This provides an edge by the floor so you don't have to cut it in carefully and it protects the rest of the floor while you're painting. My mom and step-dad suggested this and implemented it in a couple of rooms. It saved my life the day I moved the paint ladder too close to the wall and didn't notice that it dislodged the paint tray from the ladder. When I moved the ladder back out, the whole tray fell on the floor and went everywhere. All over the DROP CLOTH thank goodness.
Pro tip 2: if you decide to do this, make sure you run a box cutter across where the edge of the tape meets the edge of the trim when you are ready to remove the tape. The paint will pull off the trim if you don't separate it from the tape first. This is also true if you use painter's tape to cut in walls and trim. I cut in with a steady hand and Purdy 2.5 inch angle brush, but not everyone is a painting expert. lol

Pro tip 3: always start with the ceiling. It will splatter on the walls when you roll because ceiling paint is generally pretty thin (also an additional valid argument for the dropcloth). Better to paint the ceiling first than paint the walls twice. Paint the trim second. You usually want to pick a higher gloss paint for trim (I used semi-gloss, but some use high gloss). Higher gloss paint is typically easier to clean and works well for trim or doors that will constantly get dirty from your hands. Wall color goes on last. It's easier to touch up trim than walls especially if you are using a higher gloss paint on the trim. If you have time to let the paint on the trim cure before painting the walls, even better. Painter's tape is actually not super friendly when you apply it to uncured paint. Also, don't leave it on there for too long after the paint is dry. It will get stuck and not come off without removing the paint underneath it/or leave a sticky residue (hence why I usually avoid it).
Pro tip 4: make sure you mix up your paint. Shake the can before you open it, use the paint stick stirrers they give you, and if you bought 5 gallon buckets, invest in a mixing paddle for your drill. If the paint isn't evenly mixed up, it will not be a consistent color or thickness when you use it. Also, if you buy more than one gallon of paint, buy a big bucket and mix the two gallons together. Shades can vary slightly if they don't mix them exactly right at the store. Unless of course you're looking for a two-tone room. lol

Back to our regularly scheduled programming... in addition to the freshly smooth ceilings and walls, and new ceiling, wall and trim paint, these rooms also got: new switches and receptacles (thanks to dad for installing), new faux wood 2 inch blinds (thanks to mom and step-dad for installing), new doorknobs (satin chrome), and new black satin finish ceiling fans with clear shades. These fans are pretty cheap ($80) Hunter fans from Lowe's. I installed them in our current house about 6 years ago and they have pretty much been on for that entire time (and are still going strong with no wobbles or weird noises). They aren't too big for a smaller room, but they are powerful enough for a larger room. And did I mention cheap?

Look at how that wretched ceiling turned out...

Pretty amazing right? I didn't take a lot of after pictures of the bedrooms before my sister moved into the house. But I am such an expert mudder/sander/painter that they all look uniform anyhow. lol This is how the master bedroom looks with the gray walls and white trim...

Pretty fantastic, since we started with this...

It's kind of amazing what a little paint will do. And HOURS AND HOURS of mudding and sanding, ad nauseam.
Side note: Marguerite's favorite color was clearly green. The carpet was green. The kitchen was green. The furniture was green. I fought with myself a lot over painting everything gray. She wouldn't like it. I started to paint one of the closets green for the hell of it. I may still do that. But despite all of that... I think she would still be proud of the progress that I have made and how cute my sister is making things now...


Comments
Post a Comment